However infrequently it happens, there are still times when we have to know how to write a check. And so, I will use this check sample to teach you what I know about the parts of a check and how to use one.
When I was growing up, I learned how to balance a checkbook in school. This might tell my age, but I’m actually not that old (at least I don’t think so).
Technology has changed so much over the years that when I finally came of age to need to use that knowledge, it’s kind of been obsolete. These days we don’t have to balance a checkbook to know how much money is left in the bank account, I can easily pick up the cell phone next to me and check online.
But, it’s not good to be in a situation where you need to fill one out and don’t know how so here it is:
Fun Fact: The British and Canadians spell it, cheque.
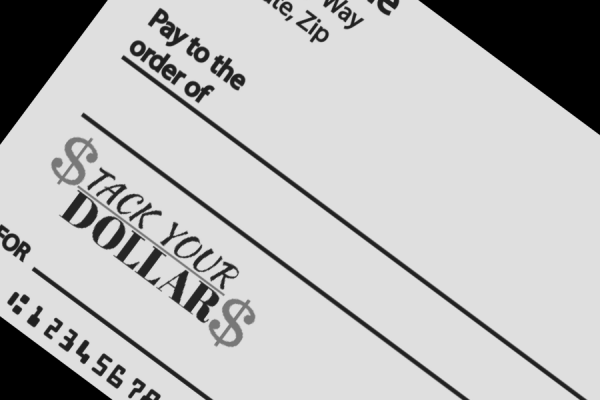
Check Sample
This is how a blank check will look before any information is written on it.

Parts of a Check
There are several sections on a check and they are all important. I’ve created this sample and labeled all the parts so you can learn how to understand a check.

1. Account Holder Information:
This pre-filled area contains the drawer’s information, this is the person who has written the check.
2. Date of Issue:
This is where the date that the check was written will be. Some checks are void after a certain amount of days from this date. In a few countries, it is also legal to write a post-dated check. This is when a date in the future is written on the check and it is not payable until then.
3. Check Number:
Usually 3-4 numbers long, this helps you keep track of your checks. They each have a number in your checkbook going in numerical order. The check number is written in two places on a check.
4. Fractional Number:
This is the fractional routing number of the bank, XX-yyyy/zzzz. The first 2 digits signify the region the bank is in (xx). It is followed by the 5th to 8th digits in the routing number(yyyy) and then the 1st to 4th digits (zzzz).
5. Payee:
This is the recipient of the check whom the money is going to; it can either be a person or a company.
6. Numeric Check Amount:
The amount of the check is written in numbers.
7. Written Check Amount:
The check amount is again placed here, in writing, as a confirmation. Though the numeric and written number should match the number in this area takes precedence. The numeric amount is easier for someone to try and change.
8. Bank Information:
This is the drawee information, the financial institution where the money will be coming from.
9. Memo Field:
This field is optional but can be a helpful reminder of what the check was written for. For instance, you can put “Groceries” or “January Rent”. If you’re paying a bill, you might also have to put your account number with that company on this line. This will make sure the money goes to pay off your bill and you don’t end up with a late charge.
10, 11, & 12: This is called the MICR line:
It contains a magnetic ink character recognition code (MICR code) that is easily read by machines. Starting around the 1960s, it streamlined the process of sorting and clearing checks, whereas before it was done manually.
10. Routing Transit Number (RTN):
Also simply called the routing number on a check or the ABA (American Bankers Association) number. It is a 9-digit number used to identify the financial institution the account holder is a part of.
11. Account Number:
This unique identifier is usually 10 to 12 digits long and is the personal account number of the person writing the check. The bank account number tells exactly where the money will be coming out.
12. Check Number:
The second area for the check number.
13. Signature Line:
This is a security feature that validates the check. The person who wrote the check must sign this area with the same signature used when they opened the bank account.
How to Write a Check (aka Cutting a Check)
Now that you’ve learned to identify the parts of the check, you’re ready to write one. Using this cute little sample check again, I’ll now show you how to fill out a check; It’s quite easy.
I will use the same numbers from showing the parts of the check so you can look back for reference as well.

2. Date of Issue: Write the date here
5. Payee: The person or company you are giving money to
6. Numeric Check Amount: This is the check amount in numeric form. Note that there are cents added even though it is zero; Doing it this way keeps someone from changing the check and adding on money.
7. Written Check Amount: Start as far to the left as possible, then write the check amount out here in words. The cents are written here as a fraction with 2 digits over 100 (100 cents make a dollar). For security and to make sure the check is not tampered with, the cents are written even if there is none and a line is drawn to prevent anything from being added after.
9. Memo Field: Again, this area is optional and can be used as a reminder, but might also need to have an account number if paying a bill.
13. Signature Line: Sign here to validate the check.
Wasn’t that easy? Now you know how to make a check!
What to do when you get a check?
Yes! You’ve got money!
Now that someone has given you a check, you’ll want to know how to turn that into cold hard cash or save it for later. For this, you’re going to have to go get your check cashed or deposit it.
Before going, ensure that the check parts are properly filled out to you with your correct name, and the correct amount.
How to Endorse a Check
You’ll also have to endorse (sign) the check on the back with the same name as the payee line on the front (#5) and make sure it is in the specified area. It’s best to wait until you are depositing the check before signing it.
If signed and lost, it could be possible for someone else to deposit it in their account. However, you can also write, “For deposit only to account #1234567899” above your signature.

How to Cash a Check
There are several ways to cash a check.
- At your bank: This is the option that is least likely to have any fees. However, you might only be able to get a certain amount of it and have to deposit the rest until it clears (the process of authenticating and exchanging the funds). There is a chance that the person didn’t have the right amount of money in their account and the check will bounce.
- Going to a grocery store: A grocery store that offers check cashing is likely to have low fees.
- At the drawer’s bank: Remember you can find this information in section 8 on the check, right above the memo line. Cashing the check here might allow you to get the full amount since they have access to the drawer’s financial information, but you might have to pay fees.
- A check cashing store: These businesses should be your last resort. Though you are most likely to get any checks cashed here, they charge high fees for taking this risk. If the check doesn’t clear they would lose out on money, so they make up for that with their fees.
How to Deposit a Check
Depositing a check used to be limited to going into the bank, now there are several convenient ways to deposit a check.
- Inside the bank: Carry your check, your bank card, and a form of ID. You might have to fill out a deposit slip at the front desk and take it with you to the teller.
- At an atm: You must go to an atm specifically for your bank to deposit a check. Once you log in with your card and access code, follow the prompts and feed your endorsed check into the machine. It’ll take a few seconds to read the check and then let you confirm the amount on it.
- On your smartphone: Don’t you just love technology? If it’s available at your bank, you can use their mobile app to deposit your check. Simply log in and take a clear picture of the front and the back of your endorsed check. You’ll want to keep the check for a few months, just in case there is an issue with the bank.
Check Scams
There are many dishonorable people out there that are trying to scam people out of their hard-earned money. I would hate for anyone to fall prey to these criminals.
Though there are many security measures on a check, the time it takes to clear at the bank still makes it vulnerable.
- The recipient is given a check in exchange for goods. After a few days, it turns out the check did not clear either due to lack of funds (bounced check) or it was a fake check.
- This scam comes in several forms, it can be a job offer, sudden riches, or overpayment for goods. The basis of all of them is that you are receiving a check and have to send out money to either cover some kind of fund, fee, or repayment. In the end, the check they sent you bounced and you lost the money you sent them.
A long time ago, a friend of mine got an offer for a babysitter position. I can not remember the exact details, but the parents wanted to send money and have my friend mail something to them.
They would send say… $1000, ask for $700 in goods, and then say they could keep the remaining $300. Of course, we knew this was a scam and ended the conversation there.
If anyone is asking for money or a refund, end the transaction!
FAQ
The bottom of the check contains the identifying information of where to collect the funds. It includes the routing number, account number, and check number
“MP” stands for microprinting and means there is a micro security print in the check, it’s one of the various security features embedded in the design.
The only optional section of a check is the memo line; however, if you’re paying a bill, you might have to include your account number there.
The memo field (or “for” line) is where you should write the purpose of a check. In the check sample above, it is the #9 label.
The 13 parts of a check include the account holder information, date of issue, check number, fractional number, payee, numeric check amount, written check amount, bank information, memo field, MICR line (includes the routing number, account number, and check number) and signature line.

If you’ve found this post informative, please pin it to share. Also, take a look at this post on creating a simple, starter budget!